Product Photography
How to Photograph Your Shopify Products at Home
The gear you actually need, a 6-step setup that works on a kitchen table, the 5 mistakes that make DIY shots look cheap, and the one job where AI beats even a well-lit home studio.
By Prodofoto Team • 9 min read • Published July 1, 2026
Quick Answer
You can shoot clean, sellable product photos at home with a smartphone, a sheet of white foam board, and a window. The six steps: find indirect natural light, build a curved white background, bounce light back with a second foam board, clean and position the product, shoot at 1x zoom with tap-to-lock focus, and edit with Auto in Photos or Snapseed. That covers white-background catalog shots very well. Lifestyle shots — product in context, on-model apparel, scenes that tell a story — are where DIY gets expensive and slow. That's where AI product photography fills the gap: tools like Prodofoto generate up to 9 lifestyle shots per product in ~60 seconds for about $1, with no prompting needed.
What you actually need
The internet loves to sell you photography gear. Here is what actually matters for clean Shopify product shots at home.
Must-haves
- ✓A north or east-facing window
- ✓Two sheets of bright white foam board ($3–5 at any drugstore)
- ✓Masking tape
- ✓A microfiber cloth
- ✓Your smartphone
Nice-to-haves (not required)
- +Tabletop phone tripod ($15–25)
- +Daylight LED panel for night shoots ($30–60)
- +Mannequin or dress form for clothing
- +Snapseed or Lightroom Mobile (free)
Skip lightboxes, ring lights, and photography tents. A well-placed window beats a cheap $40 lightbox every time, and ring lights create circular reflections in shiny products (glass bottles, jewelry, patent leather) that are annoying to edit out.
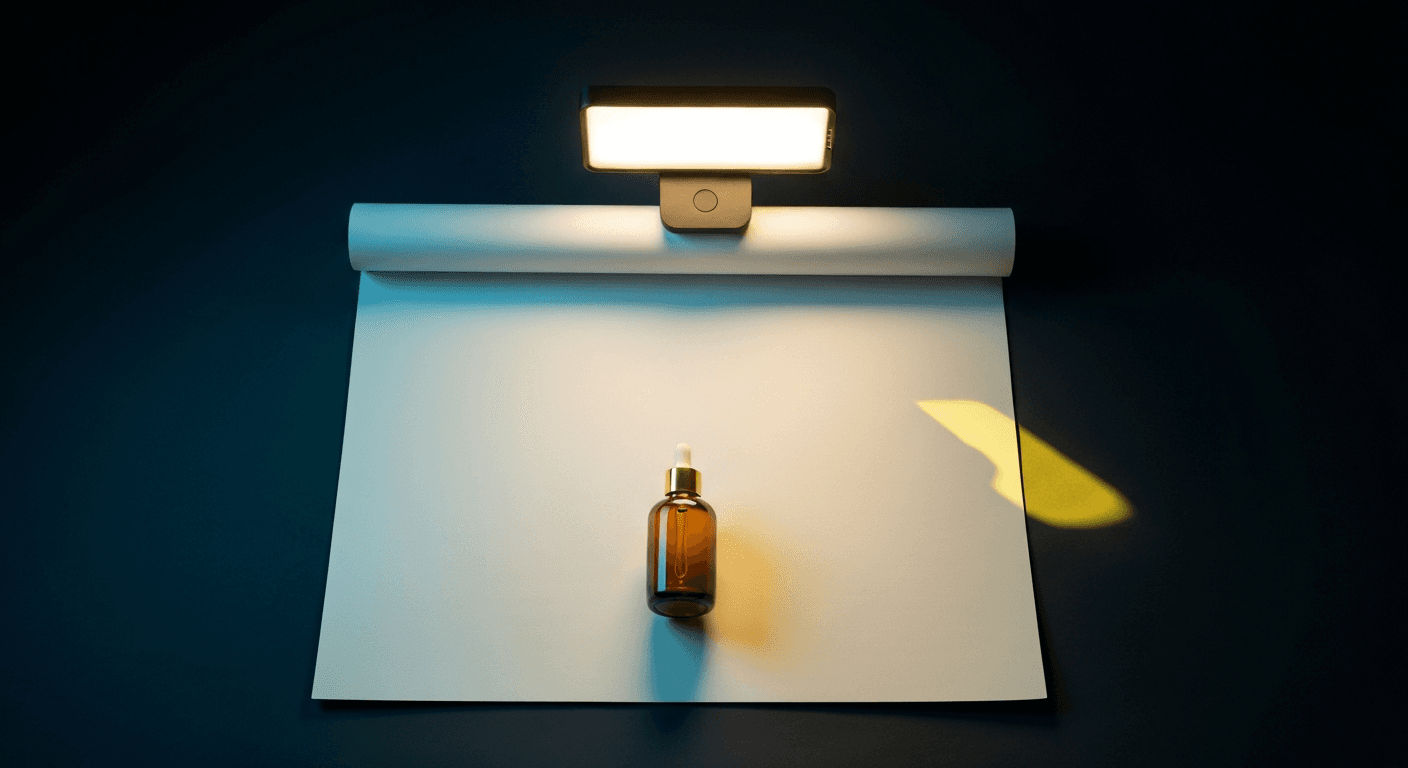
The 6-step home setup
This setup takes about 15 minutes to assemble the first time, and about 3 minutes once you know where everything goes.
- 1
Find indirect natural light
Look for a window that faces north or east. You want soft, diffused light — not harsh sun cutting across the product. The best conditions are an overcast day or a window in shade. Set up 12–18 inches from the window, perpendicular to it so light comes from one side.
If your only window gets direct sun, tape a single layer of white paper or a white bedsheet over it. One diffusion layer kills the harshness and gives you soft, even light.
- 2
Build a seamless white background
Tape one end of a foam board to the wall at about shoulder height and let it curve down to your table or floor, forming a smooth "sweep" shape. No visible corners, no horizon line, no seams. This is the same technique pro studios use, scaled down to your kitchen table.
For small products (candles, skincare, jewelry), one sheet is enough. For larger items like bags or shoes, tape two sheets side by side.
- 3
Add a reflector on the shadow side
Your product has a light side (facing the window) and a shadow side (facing away). Without a reflector, the shadow side will be noticeably darker and the image will look flat. Take your second foam board and hold or tape it on the shadow side, angled so it bounces soft light back.
Start about 8 inches from the product and adjust until the shadow side softens to a pleasant gradient, not a hard dark edge. This one step separates amateur shots from professional-looking ones.
- 4
Clean and position your product
Before you touch the camera, spend two minutes on the product:
- Wipe with a microfiber cloth (fingerprints and dust are invisible in person but obvious at 2048px)
- Face the label directly at the camera
- For clothing: steam or iron, use clips at the back to tighten loose fabric
- Center the product with equal space on all sides for Shopify's auto-cropping
- Angle the camera 10–20 degrees above the product so it looks three-dimensional, not flat
- 5
Shoot at 1x zoom with locked focus
A few settings that matter:
- 1x zoom only. Digital zoom crops quality away; optical zoom distorts edges. Use 1x and crop in editing.
- Turn on grid lines to keep the shot straight (Settings → Camera on iPhone).
- Tap-to-lock.On iPhone, hold your finger until you see "AE/AF Lock." On Android, tap once and look for a padlock icon.
- Shoot 15–20 frames. The keeper rate on product photography is lower than you'd expect.
If you have a tripod, lock the composition first and then shoot, so every frame is identical and you can pick the best one in editing.
- 6
Edit and export for Shopify
You do not need Lightroom or Photoshop. Here is a minimal edit that works:
Apple Photos / Google Photos: Tap Edit → Auto. That handles 80% of corrections. Bump Brilliance or Clarity up 10 to sharpen product edges.
Snapseed (free): Tools → Tune Image. Brightness +5, Contrast –5, Highlights –15, Shadows +10. Then Tools → Selective, tap the background, Brightness –5 for a cleaner white.
Export settings: JPG at 90% quality, minimum 2048×2048px. Shopify recommends square images; export to 1:1 if your product fills the frame.
5 mistakes that make DIY shots look cheap
Most DIY product photos fail for one of five reasons. All five are easy to avoid.
Shooting in direct sunlight
Hard shadows from direct sun stretch across the background and are impossible to fix in editing. The fix is either an overcast day or a single layer of white paper diffusing the window. You can't soften light after the shot.
Cream or blue-tinted foam board
Not all white foam board is actually white. Dollar-store boards often have a cream or cool blue tint that transfers as a color cast onto your product. Buy "bright white" foam board from a proper office supply or art store, and test it against a fresh sheet of printer paper before shooting.
Using digital zoom
On most phones, zooming past 1x (or the maximum optical zoom if you have multiple lenses) activates digital zoom, which degrades image quality. Shoot at 1x and crop in editing instead. You lose no quality and get full control over the final composition.
Skipping the reflector
One-sided window light without fill creates a harsh, uneven look. A second foam board costs $3 and adds the fill that makes the shadow side look intentional instead of forgotten. It takes 30 seconds to set up.
Not cleaning the product first
Dust and fingerprints are nearly invisible to the naked eye but show up clearly at 2048px. A microfiber cloth before every shoot takes 90 seconds and eliminates the most common reason a good DIY setup produces bad results. If you sell glass, metal, or anything shiny, this step is non-negotiable.
For more on what kills product photo conversions specifically, see our guide on product photo mistakes that hurt Shopify conversion.
DIY vs AI: before and after
A well-executed DIY setup produces a clean, professional white- background shot. That is genuinely useful for catalog pages and Google Shopping. What it cannot produce in a reasonable amount of time is a contextual lifestyle shot — product in use, in an environment, telling a story. Those shots require props, room decor, lighting rigs, and usually a model. AI generates them in 60 seconds.


Related: Lifestyle photos vs white background — which converts better on Shopify?
When AI beats DIY
DIY is the right answer for clean white-background catalog shots of products you can physically hold and place on a table. AI is the right answer for everything else.
Lifestyle and contextual scenes
Replicating a styled scene — coffee mug on a marble countertop next to a croissant, skincare bottle on a bathroom shelf with towels and greenery — requires buying props, setting up decor, and renting or building the space. AI generates it from a single product photo. Prodofoto's Lifestyle mode picks the scene automatically based on the product.
On-model apparel shots
Apparel shot on a human model converts significantly better than flat lay. Booking a model, photographer, and studio for a single SKU runs $200–500. AI on-model photography generates those shots for about $1 each, and because it's AI-generated you never need to book a reshoots.
9 variations per product
Getting 9 distinctly different product shots at home — different angles, different backgrounds, some with props, some without — takes a full afternoon per product. Prodofoto generates up to 9 photos per product in 60 seconds. At catalog scale (100+ SKUs) that's the difference between weeks and hours.
Catalog consistency
When you shoot 50 products at home over three months, the lighting changes every session. AI generates every product with consistent lighting and scene style, so your product gallery looks like a real brand, not 50 separate days at a kitchen table.
Cost per product
A DIY home setup costs $50–95 upfront. But your time has value. If a product shoot takes 30 minutes from setup to edited export, and you make more than $2/hour, AI at ~$1/product beats the math pretty quickly. See our breakdown of product photography costs for exact numbers.
The practical split most Shopify merchants land on: DIY for the main catalog shot (it keeps authenticity, and customers trust it for "what does the actual product look like?"), AI for everything else — lifestyle, on-model, scene variations, infographic shots. You can read more about that tradeoff in our AI vs traditional product photography comparison.
Add lifestyle shots without a studio
Prodofoto plugs into your Shopify store and turns any product photo into up to 9 AI-generated lifestyle, on-model, or infographic shots. No prompting, no studio, no booking anything... just upload, pick a mode, and get the shots in 60 seconds.
- ✓5 photoshoot modes: Product-Only, On-Model, Lifestyle, Infographic, Copycat
- ✓Up to 9 photos per shoot, about $1 per product
- ✓1-click publish directly to your Shopify product page
- ✓AI editing in plain English with full version history
Frequently asked questions
- What is the minimum equipment for home product photography?
- A north or east-facing window, two sheets of white foam board (one for background, one as a reflector), and a smartphone. That covers clean white-background shots for most small-to-medium products. A tabletop phone tripod ($15–25) is helpful but optional.
- Is natural light or artificial light better for product photos at home?
- Natural light from a window is almost always better than cheap artificial light. Soft, indirect window light is even and flattering, while most budget LED panels create hot spots and color casts. If you need to shoot at night, a daylight-balanced LED panel (5600K color temperature) held at 45 degrees to the product comes closest to window light.
- What phone camera settings should I use for product photography?
- Shoot at 1x zoom (never digital zoom), turn on grid lines, and use tap-to-lock focus on the product. In bright conditions, lower the exposure slightly so the white background stays white instead of blowing out. On iPhone, hold your finger on the product to activate AE/AF Lock. On Android, look for a padlock icon after tapping to focus.
- How do I get a pure white background in product photos at home?
- Three things: use 'bright white' foam board (not cream or blue-tinted), make sure the background is well-lit (add a second foam board reflector to bounce light onto it), and in editing push the Highlights slider down slightly to recover any blown-out areas. If the background still looks off-white after editing, use the Background Eraser or Magic Wand in a free app like Canva or Remove.bg to replace it with pure white (#FFFFFF).
- When should I use AI product photography instead of DIY?
- DIY works well for clean white-background catalog shots. AI is faster and produces better results for lifestyle scenes (product in context), on-model apparel shots, multi-product scenes, and when you need 9 variations of a single product in 60 seconds. AI product photography also scales: getting consistent lighting across 100 products at home is hard; with AI it is the same process per product regardless of catalog size.
- How much does a home product photography setup cost?
- A minimal setup — two foam boards and masking tape — costs $6–10. A decent phone tripod adds $15–25. A daylight-balanced LED panel for night shooting runs $30–60. That totals $50–95 for a solid DIY setup. Traditional studio photography for the same shots typically runs $50–150 per product. AI product photography with Prodofoto costs about $1 per product and generates up to 9 shots per product in 60 seconds.
- What image size does Shopify recommend for product photos?
- Shopify recommends 2048×2048px minimum for product images, with a maximum of 4472×4472px. Square (1:1) works well for product pages. Use JPG at 80–90% quality to keep file sizes under 1MB while preserving enough detail for the built-in zoom feature. Shopify will auto-generate smaller versions for thumbnails and mobile views.
References
- Shopify Help Center — "Product image guidelines and best practices" (2026). Shopify recommends minimum 2048×2048px, square images, JPG or PNG.
- Baymard Institute — "Product Image Best Practices for E-Commerce" (2025). 67% of online shoppers say image quality is "very important" for purchase decisions.
- Google Merchant Center Help — "Image requirements for product listings" (2026). Clean white or light gray backgrounds are recommended for Shopping ads.
- Nightjar Photo — "Window Light for Product Photography" (2024). Detailed breakdown of north vs south vs east vs west window light quality throughout the day.
- Prodofoto — AI Product Photography for Shopify: The Complete Guide
- Prodofoto — How to Generate AI Lifestyle Product Photos